
Best Laravel Installation Tools to Buy in October 2025
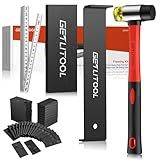
GETLITOOL Laminate Wood Flooring Installation Kit, Flooring Tools with Double-Faced Mallet, Laminate Hammer Set with Pull Bar, Solid Knock Block and 60x Spacers for Flooring Installation
- ERGONOMIC SOFT-GRIP HANDLE FOR EFFORTLESS FLOORING INSTALLATIONS
- HIGH-STRENGTH PULL BAR PREVENTS DAMAGE TO WOODEN BOARDS
- 60 NON-SLIP SPACERS ENSURE EFFICIENT AND ACCURATE INSTALLATIONS


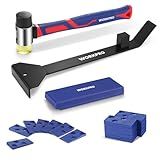
WORKPRO 43PC Laminate Flooring Installation Kit- Rubber Mallet with Fiberglass Handle, 17” Heavy Duty Pull and Pry Bar, Solid Tapping Block and 40 Spacers- Premium Wood Flooring Installation Tool
-
DURABLE PULL BAR FOR VINYL PLANK FLOORING STRONG A3 STEEL, 17 LONG, CORROSION-RESISTANT FOR LONG-LASTING USE.
-
VIBRATION-ABSORBING FIBERGLASS MALLET NON-SLIP GRIP DESIGN REDUCES FATIGUE, ENSURING PRECISE HITS EVERY TIME.
-
COMPREHENSIVE FLOORING INSTALLATION KIT INCLUDES ESSENTIAL TOOLS FOR PROFESSIONAL RESULTS AT HOME OR WORK!
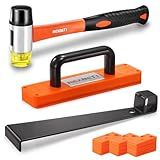
REXBETI 43-Piece Upgraded Laminate Flooring Tools, Wood Flooring Installation Kit, Solid Tapping Block with Handle, Durable Pull Bar, Diameter 1 3/8" Reinforced Double-Faced Mallet, 40 Spacers
-
HIGH-STRENGTH MALLET ABSORBS VIBRATION, ENSURING A COMFORTABLE GRIP.
-
UPGRADED PULL BAR FEATURES DURABLE DESIGN WITH PROTECTIVE FLOOR PADS.
-
TAPPING BLOCK EASILY INTEGRATES WITH MALLET FOR FASTER INSTALLATIONS.
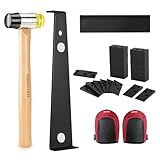
Goldblatt Laminate Wood Flooring Tools Installation Kit with 100 Spacers, Reinforced Double-Faced Mallet, Tapping Block, Heavy Duty Pull Bar, and Protective Knee Pads
- DURABLE CAST IRON MALLET WITH PVC HEAD FOR SOFT, POSITIVE STRIKES.
- PREMIUM STEEL PULL BAR PREVENTS DAMAGE WHILE ENSURING STRONG PERFORMANCE.
- ERGONOMIC DESIGN WITH KEEN PADS FOR COMFORTABLE, FATIGUE-FREE INSTALLATIONS.
To install Laravel, you first need to have Composer installed on your machine. Composer is a dependency manager for PHP that will help you to easily install Laravel and its required dependencies.
Once you have Composer installed, you can open your terminal or command prompt and run the following command:
composer global require laravel/installer
This command will download and install the Laravel installer globally on your machine. After the installation process is complete, you can create a new Laravel project by running the following command in your terminal:
laravel new project-name
Replace "project-name" with the desired name for your new Laravel project. This command will create a new Laravel project in a directory with the specified name.
You can then navigate to the directory where your new Laravel project was created and start a development server by running the following command:
php artisan serve
This command will start a development server that you can access in your web browser at http://localhost:8000. You can now start developing your Laravel application by creating routes, controllers, views, and more.
How to install Laravel templates?
Here is a step-by-step guide on how to install Laravel templates:
- Download the Laravel template that you want to install from a reputable source.
- Extract the contents of the downloaded template file.
- Copy the extracted template files to your Laravel project directory. You can paste the files in the resources/views/ folder of your project.
- Open your project's terminal and run the following command to clear the cache and reload the configuration: php artisan config:clear
- Next, run the following command to clear the compiled views: php artisan view:clear
- Now, you can access the installed template by visiting your project in a web browser. The template should be visible and styled according to the design of the template you installed.
That's it! You have successfully installed a Laravel template. Remember to always back up your project files before making any changes.
How to install Laravel dependencies?
To install Laravel dependencies, you can use Composer, which is a dependency manager for PHP. Follow these steps to install Laravel dependencies:
- Navigate to the root directory of your Laravel project in your terminal.
- Run the following command to install all dependencies listed in the composer.json file:
composer install
- Wait for Composer to finish installing the dependencies. Once it's done, you should see a vendor directory in your project folder.
That's it! You have successfully installed Laravel dependencies using Composer.
How to install Laravel packages?
To install Laravel packages, you can use Composer, which is the dependency manager for PHP. Here's how you can install Laravel packages using Composer:
- Open your terminal or command prompt
- Navigate to the root directory of your Laravel project
- Run the following command to install the package:
composer require vendor/package-name
Replace 'vendor/package-name' with the actual name of the package you want to install. For example, if you want to install the 'laravel/ui' package, you would run:
composer require laravel/ui
- Composer will download and install the package along with its dependencies. Once the installation is complete, the package will be added to your project's 'composer.json' file and the vendor directory.
- You may need to register the package's service provider in your 'config/app.php' file if required by the package. Check the package documentation for specific installation instructions.
That's it! You have now successfully installed a Laravel package using Composer.
How to install Laravel on a VPS?
To install Laravel on a VPS (Virtual Private Server), you will need to follow these steps:
- Log in to your VPS using SSH (Secure Shell). You can use a tool like PuTTY to access your server.
- Update the system packages by running the following command:
sudo apt-get update
- Install some required packages such as PHP, Composer, and Node.js:
sudo apt-get install php php-cli php-mysql php-mbstring php-xml composer nodejs npm
- Install Laravel using Composer:
composer global require laravel/installer
- Create a new Laravel project in the desired directory:
laravel new your-project-name
- Set the appropriate permissions for Laravel directories:
sudo chown -R www-data:www-data /var/www/html/your-project-name sudo chmod -R 775 /var/www/html/your-project-name/storage
- Create a virtual host configuration file for your Laravel project (if not already done):
sudo nano /etc/apache2/sites-available/your-project-name.conf
Add the following configuration to the file:
<VirtualHost *:80> ServerAdmin admin@your-domain.com DocumentRoot /var/www/html/your-project-name/public ServerName your-domain.com
<Directory /var/www/html/your-project-name/>
    Options Indexes FollowSymLinks
    AllowOverride All
    Require all granted
</Directory>

ErrorLog ${APACHE\_LOG\_DIR}/your-project-name\_error.log
CustomLog ${APACHE\_LOG\_DIR}/your-project-name\_access.log combined
- Enable the virtual host configuration and restart Apache:
sudo a2ensite your-project-name.conf sudo service apache2 reload
- You should now be able to access your Laravel application by entering your VPS IP address or domain name in a web browser.
Please note that these are general steps and may vary depending on your VPS provider and specific configuration. It's recommended to refer to the official Laravel documentation for more detailed information on installation and configuration.
How to install Laravel on WAMP?
To install Laravel on WAMP, you will need to follow these steps:
- Download and install WAMP on your computer Firstly, you need to download WAMP (Windows, Apache, MySQL, PHP) and install it on your computer. You can download WAMP from the official website: https://www.wampserver.com/en/
- Download and install Composer Composer is a dependency manager for PHP, and Laravel uses Composer to manage its dependencies. You can download Composer from the official website: https://getcomposer.org/
- Open a command prompt After installing Composer, open a command prompt on your computer.
- Install Laravel using Composer Run the following command in the command prompt to install Laravel:
composer global require "laravel/installer=~1.1"
This command will install Laravel globally on your computer.
- Create a new Laravel project Navigate to the directory where you want to create your Laravel project in the command prompt. Then run the following command to create a new Laravel project:
laravel new project-name
Replace 'project-name' with the desired name for your project.
- Configure WAMP Once the Laravel project is created, you need to configure WAMP to point to the public directory of the project. You can do this by editing the httpd.conf file located in the WAMP installation directory.
Locate the following line in the httpd.conf file:
#DocumentRoot "${INSTALL_DIR}/www" #<Directory "${INSTALL_DIR}/www/">
And change it to:
DocumentRoot "C:/path-to-your-laravel-project/public" <Directory "C:/path-to-your-laravel-project/public/">
Replace C:/path-to-your-laravel-project with the actual path to your Laravel project directory.
- Restart WAMP After making these changes, restart WAMP to apply the configuration changes.
Now, you should be able to access your Laravel project through your web browser by typing http://localhost followed by the name of your Laravel project in the address bar.