Best Event Handling Tools to Buy in October 2025
Super Z Outlet 8" Stainless Steel Straight Edge Butter Cheese Cream Sandwich Condiment Spreader Knives with Wood Handle for Kitchen Tools, Cooking Utensil, Event Guest Serving (4 Pack)
- SERRATED BLADE EASILY CUTS MEATS & CRUSTY BREADS FOR QUICK PREP.
- ERGONOMIC WOODEN HANDLE REDUCES FATIGUE FOR PRECISION & CONTROL.
- VERSATILE TOOL: SPATULA, CHEESE KNIFE, AND SANDWICH CUTTER IN ONE.


Heavy Duty Rolling Cart for Stairs:Collapsible Utility Crate with Wheels & Handle Foldable Tote Box for Toolbox Trade Show Supplies Teachers TODAYGO Mobile Storage Cart with Lid
- EXPANDABLE DESIGN ADAPTS TO YOUR NEEDS FOR ULTIMATE STORAGE VERSATILITY.
- EFFORTLESS MOBILITY WITH SMOOTH-ROLLING WHEELS FOR EASY TRANSPORT.
- COMPACT FOLDABLE DESIGN SAVES SPACE WHEN NOT IN USE.

Boao 2 Pcs 9 Inch Cowbell with Wrist Strap Noise Makers for Sporting Events Loud Hand Bell with Handle Graduation Football Games Party Farm Bells Hand Chimes Percussion Musical Instruments(White)
- LOUD, CLEAR SOUND: PERFECT FOR CHEERING OR SAFETY ALERTS AT EVENTS.
- DURABLE DESIGN: STURDY MATERIALS ENSURE LONG-LASTING, RELIABLE USE.
- COMPACT SIZE: EASY TO CARRY, FITS IN YOUR BAG FOR ON-THE-GO CONVENIENCE.
BLUE PANDA Cow Bell Noise Maker - 9-Inch Red, 2 Pack - Cow Bells for Sporting Events & Cheer - Sport Cowbell with Handle
-
PERFECT FOR EVENTS: IDEAL FOR SPORTS, WEDDINGS, AND CELEBRATIONS!
-
SAFETY FIRST: LOUD NOISE MAKER AIDS ELDERLY AND HANDICAPPED SAFETY.
-
CUSTOMIZABLE FUN: PERSONALIZE EASILY FOR UNIQUE CRAFT ACTIVITIES!
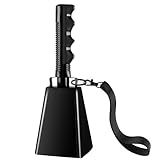
cyrico Cow Bell, 9 Inch Cowbells for Sporting Events, Metal Steel Cowbell with Handle, Loud Noise Makers for Football Games, Black Large Hand Bells Cheering Items School Musical Percussion Instruments
-
LOUD, CLEAR SOUND ENERGIZES CROWDS AT ANY EVENT-MAKE EVERY CHEER COUNT!
-
BUILT TO LAST WITH REINFORCED WELDING AND CONSISTENT SOUND, GAME AFTER GAME.
-
HANDS-FREE WRIST STRAP ENSURES SECURE GRIP DURING LONG EVENTS AND FESTIVALS.
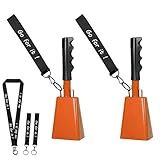
10 Inch Cowbells with Handle, Cheering Bell Noice Maker for Sporting Events-Football Games, Stadiums, Chimes Percussion Musical Instruments Call Bell Alarm 2 Pack (Orange)
-
SUPER LOUD CHEER: LOUD, LONG-LASTING SOUND FOR SPORTS & EVENTS!
-
CONVENIENT CARRY: INCLUDES WRIST & NECK STRAPS FOR HANDS-FREE FUN.
-
CUSTOMIZABLE GIFT: DECORATE FOR BIRTHDAYS OR HOLIDAYS WITH EASE!
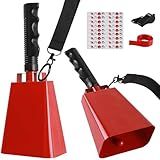
cyrico Cow Bells for Sporting Events, 2 Pack 10 Inch Cowbell with Handle, Metal Loud Noise Makers for Football Games, Large Red Cheering Hand Bell Chimes Alarm School Musical Percussion Instruments
- COMPLETE COMBO SET: INCLUDES COWBELLS, WRIST STRAPS, AND CUSTOM STICKERS!
- LOUD & POWERFUL SOUND: ENERGIZE EVENTS AND SIGNAL HELP WITH EASE!
- SECURE GRIP DESIGN: NON-SLIP TEXTURE ENSURES CONTROL, EVEN WHEN WET!

10 Pack of 6 Feet Foldable Table with Built in Handle & Steel Legs | Heavy Duty Portable | Perfect for Party, Dining, Wedding, Events, Picnic Indoor, Outdoor, Camping, Utility, Temporary
-
CONVENIENT FOLDABLE DESIGN: EASILY TRANSPORT AND STORE ANYWHERE YOU GO!
-
VERSATILE FOR ANY OCCASION: PERFECT FOR INDOOR/OUTDOOR EVENTS AND GATHERINGS.
-
DURABLE & EASY TO CLEAN: HEAVY-DUTY BUILD WITH A SMOOTH SURFACE FOR EFFORTLESS MAINTENANCE.
In Laravel, event handling and broadcasting allow you to create a system to manage and dispatch events within your application. Event handling provides a way to define and trigger events, while broadcasting allows you to share those events with other parts of your application or external services.
To implement event handling in Laravel, you need to follow these steps:
- Define Events: Create event classes that extend the Illuminate\Foundation\Events\Dispatchable class. These classes represent specific events that can occur in your application. Typically, you'll define events in the app/Events directory.
- Dispatch Events: To trigger an event, you use the event helper function or the Event facade. You pass an instance of the event class as an argument to trigger it. For example, event(new UserRegistered($user)); dispatches a UserRegistered event.
- Event Listeners: Create event listener classes that handle specific events. Event listeners can perform any necessary actions when the event is fired. They can be used to update the database, send notifications, or perform other operations. By default, listeners are stored in the app/Listeners directory.
- Register Event Listeners: To connect event classes with their corresponding listeners, you must register the event listeners in the EventServiceProvider class. You can find this class in the app/Providers directory. The listen property of the class allows you to define which events are associated with specific listener classes.
Now, let's move on to broadcasting in Laravel:
- Set Up Broadcasting Driver: Laravel supports various broadcasting drivers such as Pusher, Redis, and etc. Choose a broadcasting driver and configure it in the config/broadcasting.php file.
- Configure Broadcasting Channels: Define different broadcasting channels in the channels array of the config/broadcasting.php file. These channels specify how events will be broadcasted and who should receive them.
- Broadcast Events: To broadcast an event, you need to implement the Illuminate\Contracts\Broadcasting\ShouldBroadcast interface in the event class. This interface defines a broadcastOn method where you return the channel(s) on which the event should be broadcasted.
- Listen for Events: In your frontend, you need to subscribe to the available channels and listen for events using the broadcasting library of your choice, such as Socket.io or Laravel Echo. This allows your frontend to receive and handle events dispatched from the Laravel application.
By following these steps, you can easily implement event handling and broadcasting in Laravel, allowing you to build real-time communication and interaction between different parts of your application.
What is the role of the event facade in Laravel?
The event facade in Laravel provides a simple and expressive way to work with events in the application. It serves as a "proxy" to the underlying event service, allowing developers to easily fire and listen to events without directly interacting with the service.
The event facade offers several useful methods, including:
- fire: This method is used to trigger an event, allowing any listeners attached to the event to respond accordingly.
- listen: It is used to register a listener for an event. When the specified event is fired, the listener's callback function will be invoked.
- dispatch: This method is similar to the fire method but is generally used for dispatching queued events.
- forget: It allows you to remove a specific event listener. This can be useful if you need to dynamically remove a listener at runtime.
The event facade helps in decoupling components of an application by allowing them to communicate indirectly through events. It promotes a modular and flexible architecture, where different parts of the application can interact with each other without having direct dependencies. This makes the code more maintainable, reusable, and easier to extend.
How to pass data to an event in Laravel?
To pass data to an event in Laravel, you can use the event() function or the dispatch() method.
- Using the event() function: Write the logic to pass the data inside a function or a class method. Use the event() function by passing the event class name and the data as parameters. For example: $data = // your data here; event(new YourEventClass($data));
- Using the dispatch() method: Write the logic to pass the data inside a function or a class method. Import the Illuminate\Support\Facades\Event class at the top of the file. Use the dispatch() method by passing the event class name and the data as parameters. For example: use Illuminate\Support\Facades\Event; $data = // your data here; Event::dispatch(new YourEventClass($data));
In both cases, make sure to replace YourEventClass with the actual name of your event class that extends the Illuminate\Foundation\Events\Dispatchable class. The data you pass will be available in the event class's constructor or handle method for further processing.
Additionally, you can also define properties or methods on the event class to store the data or perform any specific actions based on the passed data.
How to handle event propagation in Laravel?
In Laravel, event propagation refers to the process of passing an event to multiple listeners. Handling event propagation in Laravel can be done in the following way:
- Define Events: First, define the events that you want to propagate. You can create an event using the event:generate Artisan command, or manually create a new class that extends Illuminate\Contracts\Events\Event.
- Create Listeners: Create listeners to handle the events. Listeners can be created using the event:generate Artisan command or by manually creating a class that implements the Illuminate\Contracts\Listener interface. Each listener should have a handle() method that will be called when the event is fired.
- Attach Listeners: Attach the listeners to the events they should listen to. This can be done in the EventServiceProvider class located in the app/Providers directory. In the boot() method of this class, add a call to the listen() method and specify the events and listeners that should be attached. For example:
protected $listen = [ 'App\Events\SomeEvent' => [ 'App\Listeners\FirstListener', 'App\Listeners\SecondListener', ], ];
- Fire Events: Fire events from your code using the event() helper function or the Event facade. For example:
event(new \App\Events\SomeEvent($data)); // or Event::dispatch(new \App\Events\SomeEvent($data));
- Event Propagation: By default, Laravel will propagate the event to all registered listeners. The listeners will be executed in the order they are defined in the listen array of the EventServiceProvider. If you want to stop the propagation of an event, you can return false from the handle() method of a listener.
- Testing: You can use Laravel's testing tools to write unit tests for your events and listeners. Laravel provides the EventFake class that allows you to assert that the events were fired and their listeners were called.
By following these steps, you can handle event propagation in Laravel and execute multiple listeners to react to events in your application.