Best Analytics Alert Systems to Buy in October 2025
Miku Pro Smart Video Baby Monitor with Camera and Wall Mount, Breathing & Sleep Tracking, Contact-Free Alerts, Sleep Analytics for Infants, Paid Membership Required
- CONTACT-FREE TRACKING WORKS THROUGH BLANKETS FOR SEAMLESS MONITORING.
- GAIN REAL-TIME INSIGHTS INTO YOUR BABY’S SLEEP AND WELLNESS PATTERNS.
- SECURE APP ACCESS FROM ANYWHERE WITH TOP-NOTCH SAFETY FEATURES.


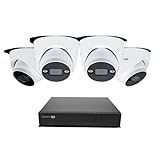
Swann AdvancedX Wired NVR 4K Security Camera System, 8 Channels, 4 PoE Cameras Outdoor, 1TB HDD Storage, Color Night Vision, Smart AI Video Analytics/Alerts, Motion Detection, 24/7 Recording
-
UNMATCHED 4K CLARITY: IDENTIFY FACES AND DETAILS WITH 8MP ULTRA HD RESOLUTION.
-
RELIABLE 24/7 MONITORING: ENJOY HASSLE-FREE SECURITY WITH WIRED POE CAMERAS.
-
PROACTIVE CRIME PREVENTION: SMART ANALYTICS TRIGGER ALERTS AND ACTIONS INSTANTLY.
Swann AdvancedX Wired NVR 4K Security Camera System, 8 Channels, 8 PoE Cameras Outdoor, 1TB HDD Storage, Color Night Vision, Smart AI Video Analytics/Alerts, Motion Detection, 24/7 Recording
-
CAPTURE EVERY DETAIL IN 4K CLARITY FOR ULTIMATE SECURITY INSIGHT.
-
24/7 WIRED SURVEILLANCE FOR RELIABLY CONTINUOUS MONITORING.
-
SMART ANALYTICS ACTIVELY PREVENT CRIME WITH INSTANT ALERTS.
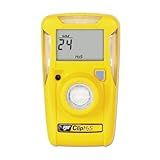
BW Technologies/Honeywell Analytics BWC2-H BW Clip Single-Gas Detector, Hydrogen Sulfide (H2S), Yellow
- ONE-BUTTON OPERATION FOR SEAMLESS USER EXPERIENCE.
- TWO-YEAR MAINTENANCE-FREE OPERATION-NO RECALIBRATION NEEDED!
- ALERTS WITH FLASH, SOUND, AND VIBRATION FOR MAXIMUM SAFETY.
Learning Analytics Explained
Swann AdvancedX™ Wired NVR 4K Security Camera System, 8 Channels, 4 PoE Dome Cameras Outdoor, 1TB HDD Storage, Color Night Vision, Smart AI Video Analytics/Alerts, Advanced Motion Detect
-
CRYSTAL-CLEAR 4K VIDEO HELPS IDENTIFY FACES AND DETAILS EASILY.
-
24/7 RELIABLE SURVEILLANCE WITH HASSLE-FREE PLUG-IN WIRED SECURITY.
-
SMART ANALYTICS ACTIVELY PREVENT CRIME WITH INSTANT ALERTS AND ACTIONS.
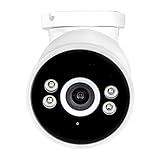
Swann AdvancedX Wired 4K Security Camera PoE Outdoor Bullet, Color Night Vision, Smart AI Video Analytics/Alerts, Advanced Motion Detection
-
STUNNING 4K CLARITY: IDENTIFY FACES AND DETAILS WITH ULTRA-CLEAR VIDEO.
-
RELIABLE WIRED SECURITY: 24/7 MONITORING WITH SIMPLE PLUG-IN POE CAMERAS.
-
SMART CRIME PREVENTION: ACTIVE ALERTS AND ACTIONS KEEP YOUR PROPERTY SAFE.

MICROSOFT FABRIC ANALYTICS ENGINEER ASSOCIATE | EXAM CODE: DP-600 | FAST TRACK PREPARATION, 10 PRACTICE TESTS, 500 FOUNDATIONAL QUESTIONS, 490+ EXAM ... 495+ CAUTION ALERTS, CONCISE EXPLANATIONS

Health Information Exchange: Navigating and Managing a Network of Health Information Systems
Setting up GA4 alerts allows you to receive notifications when specific events or conditions occur in your Google Analytics 4 property. Here's how you can set it up:
First, log in to your Google Analytics account and navigate to your GA4 property.
- In the left-hand panel, click on "Admin."
- Under the "Property" column, select "Alerts."
- Click on the "+ New Alert" button.
Next, you'll define the conditions for your alert:
- Give your alert a name to easily identify it later.
- Choose the "Alert type" based on the event or condition you want to monitor. There are different options, such as "Anomaly detection," "Conversion rate," "User engagement," and more.
- Configure the "Conditions" for your alert. This can include specific metrics, such as pageviews, sessions, conversion rate, or any custom metric you have set up. Additionally, you can select dimensions or segments to further refine the conditions.
- Set the "Period" for which you want the rule to be evaluated, such as daily, weekly, or monthly.
- Specify the "Sensitivity" of the alert. This determines the threshold at which you will be notified. Higher sensitivity means you'll receive alerts for smaller changes, while lower sensitivity indicates a higher threshold for notification.
- Define the "Notification" settings. You can choose to receive the alert via email, SMS, or both. Enter the recipients' details and customize the email subject and message if desired.
After setting up the alert, you can review the summary and save it. The alert will be active immediately, and you will start receiving notifications if the specified conditions are met.
Using GA4 alerts, you can stay informed about important changes, anomalies, or performance metrics in your website or app, ensuring that you can take timely actions to optimize your digital presence.
How can I set up alerts for low user retention rates in GA4?
To set up alerts for low user retention rates in Google Analytics 4 (GA4), you can follow these steps:
- Go to the GA4 property that you want to set up alerts for.
- Click on the "Alerts" option in the left-hand menu under the "Real-time" section.
- Click on the "+ New Alert" button.
- In the "Alert configuration" section, provide a meaningful name for the alert.
- Set the "Period" to the desired timeframe for retention monitoring (e.g., 7 days, 30 days).
- Under the "Condition" section, choose the metric you want to monitor. In this case, select "User retention" from the dropdown menu.
- Specify the threshold for low retention rates. For example, you can set it to a percentage value below your expected retention rate.
- Choose whether you want to receive the alert as an email or a notification in the Google Analytics interface.
- Configure the email/notification settings as per your preferences.
- Set the alert sensitivity, which determines how frequently the alert triggers. You can choose from "High," "Medium," or "Low" sensitivity.
- Finally, click on the "Save" button to activate the alert.
Once the alert is set up, GA4 will monitor the user retention rates based on your configurations and send an alert whenever the specified threshold is crossed. Adjust the conditions and sensitivity accordingly to fit your specific needs and objectives.
How can I create custom alerts for specific user demographics in GA4?
To create custom alerts for specific user demographics in Google Analytics 4 (GA4), you can follow these steps:
- Access GA4: Log in to your Google Analytics account and select your GA4 property.
- Navigate to Custom Alerts: In the left-hand menu, click on "Alerts" under the "Real-time" section. This will take you to the Custom Alerts page.
- Create a new alert: Click on the "+ New Alert" button to start creating a new custom alert.
- Define the alert conditions: In the "Alert conditions" section, you can customize the conditions for your alert. To target specific user demographics, you can use filters such as age, gender, or any other demographic dimensions available in GA4.
- Set thresholds and frequencies: Specify the thresholds that trigger the alert. For example, you can set a condition where the number of male users within a specific age range exceeds a certain threshold. Additionally, you can set the frequency of this alert (e.g., daily, weekly, monthly).
- Configure alert notifications: In the "Alert notifications" section, choose how you want to be notified when the alert condition is met. You can receive notifications via email and/or Google Analytics app notifications.
- Name and save the alert: Finally, provide a name for your alert and click on the "Save" button to save the custom alert.
Once saved, the custom alert will continuously monitor user demographics based on your defined conditions. If the conditions are met, you will be notified according to your specified notification settings.
Remember to regularly review and adjust your custom alerts based on your changing needs and goals.
What is the process for setting up alerts for specific user journey paths in GA4?
To set up alerts for specific user journey paths in Google Analytics 4 (GA4), you can follow the steps below:
- Sign in to your Google Analytics 4 account (formerly known as App + Web properties).
- Click on your desired property and navigate to the "Alerts" section in the left-hand menu.
- Click on the "Create alert" button.
- In the alert configuration page, give your alert a name and description to identify it. This is for your reference and will not impact the alert itself.
- Under "Conditions", select "User Journey" as the alert type.
- In the "User Journey" section, you can define the specific user journey paths for which you want to set up alerts. Select the desired conditions to identify the user journey path you want to track. For example, you can select "Event Name" equals "Page A" and "Event Name" equals "Page B" to track a specific series of pages visited by users.
- Adjust the time window under "Time range" to set the duration for which the alert will be monitored (e.g., Last 1 Day, Last 7 Days).
- Customize the alert sensitivity by moving the slider towards "More Sensitive" or "Less Sensitive" based on the level of detection you desire.
- Set the "Apply to" option to specify how often or to which views you want the alert to apply.
- Under "Alert previews", you can see a preview of the alert conditions against your historical data based on the last 28 days. Make sure the preview matches your expectations.
- Finally, click on "Save" to create the alert.
Once the alert is set up, you will receive notification emails when the conditions for the specific user journey paths are met according to the defined time range. This allows you to be informed and take action based on specific user behavior on your website or app.