
Best Shipping Option Plugins to Buy in October 2025
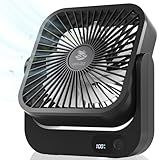
UHUZZ Cruise Ship Approved Magnetic Fan – Rechargeable & Plug-In, 5-Speed Adjustable, Quiet Operation, 6–30 Hour Battery Life, Must-Have for 2025 Cruises
- CRUISE APPROVED & ESSENTIAL - IDEAL FOR ALL MAJOR CRUISE LINES.
- STRONG MAGNETIC BASE - HANDS-FREE COOLING IN COMPACT SPACES.
- ULTRA-QUIET WITH 5 SPEEDS - ENJOY COOLING WITHOUT DISTURBANCES.


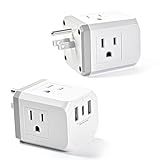
Multi Plug Outlet Extender 2 Pack, Small Electrical Outlet Splitter with 3 USB Ports (1 USB-C), Multi Outlet Plug in for Cruise Ship, Travel, Home, Office, Dorm Essential
-
VERSATILE CHARGING: 3 AC OUTLETS + 2 USB PORTS FOR ALL YOUR DEVICES.
-
SAFETY FIRST: FIRE-RESISTANT, ETL CERTIFIED FOR RELIABLE PERFORMANCE.
-
COMPACT DESIGN: SPACE-SAVING CUBE FITS ANYWHERE, PERFECT FOR TRAVEL.

Polit KT-66 Digital Kitchen Scale 18lb/8000g|0.02oz/0.5g Precision Food Scale with LCD Display|Battery or Plug-in|Stainless Steel Top|Grams & Ounces|5 Units for Baking, Cooking, Farming & Shipping
-
PRECISION & CAPACITY: 0.02OZ ACCURACY, SUPPORTS 18LB FOR VERSATILE USE.
-
FLEXIBLE POWER OPTIONS: USE AC OR 9V BATTERIES FOR ULTIMATE CONVENIENCE.
-
EASY CLEANUP: REMOVABLE STAINLESS STEEL PLATFORM FOR HYGIENIC WEIGHING.
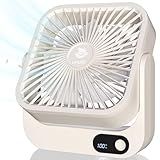
Cruise Ship Approved Magnetic Fan – Portable Rechargeable & Plug-In, 5-Speed Adjustable, Quiet Operation, Up to 12 Hours Battery Life, Perfect for 2025 Cruises
-
CRUISE APPROVED & TRAVEL ESSENTIAL: PERFECT FOR ANY CRUISE LINE.
-
STRONG MAGNETIC BASE: EASILY ATTACHES FOR SPACE-SAVING CONVENIENCE.
-
RECHARGEABLE & QUIET: ENJOY UP TO 12 HOURS OF PEACEFUL COOLING.
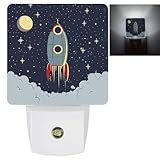
Space Exploration Rocket Spaceship Plug-in LED Night Light,Auto Dusk to Dawn Sensor Nightlights Plug into Wall,White Energy Efficient Night light for Kids Bedroom,Bathroom,Kitchen,Stairs,Hallway
- AUTOMATIC SENSOR: LIGHTS UP ONLY IN DARKNESS, SAVES ENERGY EFFORTLESSLY!
- STYLISH DESIGN: FITS ANY ROOM DECOR, IDEAL FOR KIDS AND ADULTS ALIKE.
- LONG-LASTING: UP TO 100,000 HOURS AND COSTS LESS THAN 25 CENTS ANNUALLY!
T&H XHome Plug-in LED Night Light Lamp Sensor-Outer Space Space Exploration Rocket Spaceship Printed,Automatic Dimmable Dusk-to-Dawn Square Shaped Smart Night Lights for Nursery/Bathroom/Bedroom
- COMPACT DESIGN LEAVES SPACE FOR OTHER OUTLETS-PLUG IN EASILY!
- SMART SENSOR ADJUSTS BRIGHTNESS FOR A SOFT, SLEEP-FRIENDLY GLOW.
- ECO-FRIENDLY & SAFE-IDEAL FOR ROOMS, NURSERIES, AND HALLWAYS.
To modify shipping options price dynamically in WooCommerce, you can use the available hooks and filters provided by the plugin. One way to do this is by using the 'woocommerce_package_rates' filter, which allows you to modify the shipping rates based on certain conditions or calculations. You can add custom logic within the callback function of this filter to change the shipping prices dynamically before they are displayed to the customer. Another option is to create a custom shipping method using WooCommerce's shipping API and override the default shipping rates with your custom calculations. By leveraging these techniques, you can effectively modify shipping options price dynamically in WooCommerce to better suit your business needs.
How to create custom shipping options for international orders in WooCommerce?
To create custom shipping options for international orders in WooCommerce, follow these steps:
- Go to your WooCommerce dashboard and navigate to the "Shipping" tab under "WooCommerce" settings.
- Click on the "Add Shipping Zone" button to create a new shipping zone for international orders.
- Enter a name for the shipping zone, such as "International Orders".
- Under the "Zone Regions" section, select the countries you want to include in the international shipping zone.
- Click on the "Add Shipping Method" button to add a custom shipping option for international orders.
- Choose the type of shipping method you want to offer, such as flat rate, free shipping, or a custom shipping calculator.
- Configure the settings for the shipping method, including the shipping cost, shipping class, and any additional options you want to include.
- Save your changes and test your custom shipping options by placing a test order with an international shipping address.
By following these steps, you can easily create custom shipping options for international orders in WooCommerce and provide your customers with a seamless shopping experience across borders.
How to offer shipping discounts for local customers in WooCommerce?
To offer shipping discounts for local customers in WooCommerce, you can follow these steps:
- Set up shipping zones: In your WooCommerce settings, go to the Shipping tab and click on Shipping Zones. Create a new shipping zone for local customers by entering the Zone Name (such as "Local Shipping") and adding the appropriate region(s) where local customers are located.
- Configure shipping methods: In the shipping zone settings, click on Add shipping method and select the shipping method you want to offer for local customers (such as Flat Rate or Free Shipping). Customize the shipping settings as needed, including the shipping cost and any other conditions.
- Add a discount for local shipping: To offer a discount for local shipping, you can use a coupon or discount code. Go to WooCommerce > Coupons and click on Add Coupon. Create a new coupon and set the Coupon amount to the desired discount amount for local shipping. Under the Usage restriction tab, set the Shipping location to the specific shipping zone you created for local customers.
- Notify customers about the discount: Make sure to inform your local customers about the shipping discount available to them. You can create a promotional banner on your website, send out an email newsletter, or use other marketing channels to communicate the offer.
By following these steps, you can easily offer shipping discounts for local customers in WooCommerce and encourage more sales from your local customer base.
What is the best way to change shipping rates based on weight in WooCommerce?
One of the best ways to change shipping rates based on weight in WooCommerce is to use a shipping plugin or extension that allows you to set up specific shipping rules based on weight ranges. There are several popular plugins available that can help you easily create different shipping rates based on weight, such as Table Rate Shipping, Advanced Flat Rate Shipping Method, or WooCommerce Weight Based Shipping.
To set up shipping rates based on weight using one of these plugins, you typically just need to specify the weight ranges and corresponding shipping costs for each range. For example, you can set up different rates for packages weighing 0-5 lbs, 6-10 lbs, 11-15 lbs, and so on. These plugins usually provide a user-friendly interface where you can easily configure these rules and customize shipping options according to your needs.
It's important to test your shipping rules thoroughly to ensure that they are working correctly and providing accurate rates to your customers. You may also want to consider offering free shipping for orders that exceed a certain weight threshold or incentivizing customers to purchase more products by offering discounted shipping rates for heavier items.