
Best Control Panels to Buy in October 2025
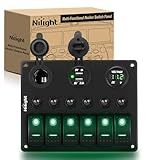
Nilight - 90123F 6 Gang ON Off Rocker Switch Panel Green Backlit 12V24V LED Digital Voltmeter Dual USB Charger Cigarette Lighter Socket Overload Protection Switch Panel For Cars RVs Boats
- VERSATILE CONTROL: MANAGE 6 CIRCUITS WITH A SINGLE, CONVENIENT PANEL.
- SAFETY FIRST: BUILT-IN OVERLOAD PROTECTION FOR RELIABLE USE.
- USER-FRIENDLY: NIGHT GLOW STICKERS FOR EASY ACCESS IN THE DARK.


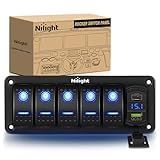
Auxbeam 6 Gang Switch Panel BC60, Universal Circuit Control Relay System Box with Automatic Dimmable On-Off LED Switch Pod Touch Switch Box for Car Pickup Truck UTV ATV Boat, 2 Years Warranty, Blue
- STREAMLINE WIRING: SIMPLIFY YOUR SETUP WITH A 6-CIRCUIT CONTROL PANEL.
- VISION-FRIENDLY DIMMING: AUTOMATIC BRIGHTNESS ADJUSTMENT ENHANCES SAFETY.
- EASY INSTALL ANYWHERE: VERSATILE DESIGN FITS ANY VEHICLE WITH NO CUTTING.

Auxbeam 8 Gang Switch Panel BA80 Automatic Dimmable LED Touch Control Panel Box Electronic Relay System Car Touch Switch Box Universal for Truck ATV UTV Boat Marine SUV Caravan -Blue, 2 Years Warranty
-
POWERFUL PERFORMANCE: MAX 1200W, OPERATES IN EXTREME TEMPERATURES, IP65 RATED.
-
USER-FRIENDLY DESIGN: AUTOMATIC DIMMABLE BACKLIGHT ENHANCES DRIVING SAFETY.
-
QUICK & EASY SETUP: PLUG & PLAY WIRING, CUSTOMIZABLE LABELS, VERSATILE MOUNTING.
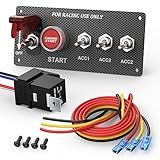
RVBOATPAT 5 in 1 Ignition Switch Panel Boat Toggle Switch Panel DC 12V 30A Racing Switch Panel Push Start Ignition Kit for Race Car Truck
- EASY INSTALLATION: PERFECT FOR DIY CAR ENTHUSIASTS TO CUSTOMIZE VEHICLES!
- UNIQUE DESIGN: RED LED TOGGLE SWITCH FOR EASY ACCESS IN THE DARK.
- DURABLE QUALITY: CARBON FIBER CONSTRUCTION PREVENTS OVERHEATING & SHORTS.
Nilight 5 Gang Rocker Switch Panel Blue Backlit with PD Type C and USB Charger Voltmeter Waterproof 12V 24V DC Switches with Night Glow Stickers for Car Trucks Boats RVs
-
VERSATILE COMPATIBILITY: FITS MOST 12V-24V VEHICLES AND MARINE CRAFTS.
-
RAPID CHARGING: POWER TWO DEVICES AT FULL SPEED, 40% FASTER!
-
DURABLE DESIGN: STRONG ALUMINUM BUILD ENSURES LONG-LASTING PERFORMANCE.
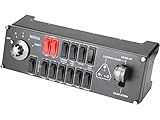
Logitech G Pro Flight Switch Panel
- REALISTIC LED GEAR STATUS FOR TRUE-TO-LIFE FLIGHT EXPERIENCES.
- FULLY CUSTOMIZABLE COCKPIT SETUP FOR OPTIMAL FLYING CONDITIONS.
- WIDE COMPATIBILITY WITH MAJOR SIMULATION SOFTWARE AND WINDOWS VERSIONS.
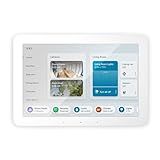
Amazon Echo Hub | 8” smart home control panel with Alexa | Compatible with thousands of devices
- CONTROL YOUR SMART HOME EFFORTLESSLY WITH ALEXA VOICE OR TOUCH.
- CUSTOMIZE YOUR DASHBOARD FOR QUICK ACCESS TO ALL DEVICES AND ROUTINES.
- SEAMLESS COMPATIBILITY WITH THOUSANDS OF SMART DEVICES FOR SECURITY.

Digital Charcoal Grill & Smokers Thermometer Controller Panel Replacement Compatible with Masterbuilt Gravity Series 560, Non-WiFi Controller
- EASY INSTALLATION & OPERATION: SIMPLE BUTTONS FOR STRESS-FREE USE.
- VERSATILE COOKING: SMOKE, GRILL, SEAR, BAKE-ENDLESS BBQ POSSIBILITIES!
- COMPATIBLE DESIGN: TAILORED FOR MASTERBUILT GRAVITY SERIES 560 MODELS.
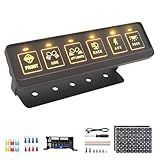
FLY KAN 6 Gang Multifunction Switch Panel, Wireless Remote Control Offroad Light Switch Panel Waterproof Universal Circuit IC Control System Switch Pod for 12V-24V Truck SUV ATV UTV Car etc.
-
SIMPLIFY CONTROL: 6-GANG WIRELESS DESIGN FOR EASY MULTI-SWITCH MANAGEMENT.
-
VERSATILE POWER OPTIONS: USB OR AAA BATTERY POWERED FOR FLEXIBLE USE.
-
WIDE COMPATIBILITY: FITS VARIOUS VEHICLES FROM OFF-ROAD TO MARINE APPLICATIONS.
To install Plesk on cloud hosting, follow these steps:
- First, ensure that you have a cloud hosting account. You can sign up for a suitable cloud hosting service provider such as Amazon Web Services (AWS) or Google Cloud Platform (GCP).
- Once you have your cloud hosting account, log in to the cloud hosting control panel or dashboard.
- Next, navigate to the marketplace or application section within the control panel. Look for the option to install Plesk. Different cloud hosting providers may have different interfaces, so the exact location may vary.
- Select Plesk from the available applications or search for it if necessary. Click on the "Install" or "Deploy" button to initiate the installation process.
- In most cases, you will need to specify certain parameters during the installation, such as the version of Plesk, the server size, and the operating system. Make the appropriate selections based on your requirements.
- Once you have provided the necessary parameters, the installation process will begin. Depending on the cloud hosting provider and your server specifications, the installation can take some time to complete.
- After the installation finishes, you will receive confirmation of a successful installation. At this point, you should have Plesk installed and ready to use on your cloud hosting account.
- Access Plesk by entering the IP address or domain name associated with your cloud hosting account into a web browser. You should see the Plesk login screen.
- Enter the initial login credentials provided during the installation process to access the Plesk control panel.
- Once logged in, you can proceed with configuring and managing your websites, domains, email accounts, databases, and other aspects of your hosting environment using the Plesk interface.
Congratulations! You have successfully installed Plesk on your cloud hosting account and are ready to start managing your websites and other hosting resources.
How to manage multiple domains using Plesk on cloud hosting?
To manage multiple domains using Plesk on cloud hosting, you can follow these steps:
- Access your Plesk control panel by logging into your hosting provider's dashboard.
- Once logged in, navigate to the "Domains" section in Plesk.
- Click on the "Add Domain" button to add a new domain.
- Enter the domain name in the "Domain name" field and set up other configuration options such as hosting type, PHP settings, and web accessibility.
- Click on the "OK" button to add the domain.
- Repeat steps 3-5 for each additional domain that you want to add.
- To manage the settings of each domain, click on the domain name in the "Domains" section. Here, you can configure various settings such as DNS, SSL certificates, email accounts, and FTP access.
- After making any changes to the domain settings, click on the "Finish" or "Apply" button to save the changes.
- To upload files for each domain, go to the "File Manager" section in Plesk and navigate to the domain's root folder. You can upload files directly or create directories as needed.
- If you want to configure custom settings for a specific domain, such as PHP version, database settings, or additional security measures, you can do so by accessing the "Hosting Settings" or "Web Server Settings" options for that domain.
By following these steps, you can manage multiple domains efficiently using Plesk on cloud hosting. Remember to properly set up DNS records for each domain to ensure they are correctly pointed to your cloud hosting server.
What is Plesk?
Plesk is a web hosting control panel software that allows users to manage their websites, domains, e-mail accounts, and other aspects of their hosting environment in a user-friendly interface. It provides a graphical interface for easy management of server settings, file management, database administration, and other hosting-related tasks. Plesk supports various operating systems and is used by hosting providers, website owners, and web professionals to manage and administer their hosting environment efficiently.
How to install and manage the Git extension in Plesk on cloud hosting?
To install and manage the Git extension in Plesk on cloud hosting, you can follow these steps:
- Log in to your Plesk control panel.
- Go to "Extensions" in the left sidebar.
- Click on "Extensions Catalog" and search for "Git" in the search box.
- Click on the "Git" extension and then click on the "Install" button.
- Once the installation is complete, go back to the "Extensions" page.
- You should now see the "Git" extension listed. Click on it to open the extension.
- In the Git extension, click on the "+" button to add a new repository.
- Enter the repository name and the URL of your Git repository. You can also provide the credentials if required.
- Click on the "Fetch" button to retrieve the branches and tags from the repository.
- Once the fetch is complete, you will see the branches and tags listed in the extension.
- You can now manage your Git repository through the Git extension in Plesk. You can perform actions like cloning, pulling, pushing, merging, and checking out branches.
Note: The steps may vary slightly depending on the version of Plesk and the hosting provider you are using. It is recommended to refer to the documentation or support resources provided by your hosting provider for specific instructions.
How to manage DNS records for individual domains in Plesk on cloud hosting?
To manage DNS records for individual domains in Plesk on cloud hosting, follow these steps:
- Log in to your Plesk control panel.
- Navigate to the "Domains" tab on the left sidebar and select the domain you want to manage.
- Click on the "DNS Settings" option under the domain name.
- Here, you can add, edit, or delete DNS records for the selected domain. To add a new record, click the "Add Record" button, select the record type (e.g., A, CNAME, MX), and provide the necessary information such as the hostname and destination IP address. To edit an existing record, click on the pencil icon next to the record and modify the required fields. To delete a record, click on the trash bin icon next to it.
- Save your changes after making any modifications to the DNS records.
- It may take some time for the changes to propagate across the internet, so be patient.
Note: It is crucial to have a good understanding of DNS records and their functions before making any changes. Incorrect modifications can result in website and email issues.