
Best Mechanical Keypads to Buy in October 2025
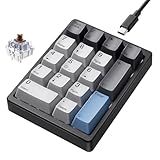
Kisnt Mechanical Number Pad,Hot Swappable Numpad Wired USB 17 Keys Keypad White Backlit Numeric Keypad with PBT Keycaps for Laptop PC Compact Keyboards (Black, Brown Switch)
-
COMPACT 17-KEY LAYOUT: BOOST PRODUCTIVITY WITH SPACE-SAVING DESIGN.
-
HOT-SWAPPABLE SWITCHES: CUSTOMIZE WITH EASE; TACTILE FEEL FOR TYPING COMFORT.
-
DURABLE PBT KEYCAPS: PREMIUM TEXTURE AND STYLISH WHITE BACKLIGHTING INCLUDED.


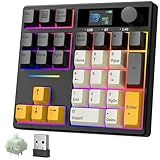
BOYI TD31Pro Mechanical Number Pad,Bluetooth5.0/2.4G/Type-C Wireless Numeric Keypad,RGB HotSwap Numpad with Screen&Knob,PBT Keycaps Rechargeable Gasket Number keypad for PC Laptop Desktop(Black-Grey)
- VERSATILE CONNECTIVITY: CONNECT VIA BLUETOOTH, 2.4GHZ, OR WIRED TYPE-C.
- CUSTOM DISPLAY FEATURES: PERSONALIZE WITH GIFS & RGB SETTINGS ON SCREEN.
- HOT-SWAPPABLE DESIGN: EASILY REPLACE SWITCHES WITHOUT SOLDERING HASSLE.
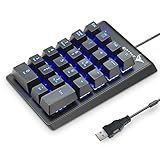
Rottay Number Pad, Mechanical USB Wired Numeric Keypad with Blue LED Backlit 22 Key Numpad for Laptop Desktop Computer PC Black (Blue switches)
-
TACTILE FEEDBACK: BLUE SWITCHES DELIVER RAPID RESPONSE AND SATISFYING CLICKS.
-
EASY SETUP: PLUG & PLAY FUNCTIONALITY BOOSTS PRODUCTIVITY INSTANTLY.
-
DURABLE DESIGN: 50 MILLION KEYSTROKES AND STURDY BUILD FOR LASTING USE.
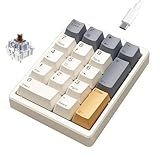
Kisnt Mechanical Number Pad,Hot Swappable Numpad Wired USB 17 Keys Keypad White Backlit Numeric Keypad with PBT Keycaps for Laptop PC Compact Keyboards (Retro Beige, Brown Switch)
-
COMPACT 17-KEY LAYOUT: BOOST PRODUCTIVITY WITH A SPACE-SAVING DESIGN.
-
HOT-SWAPPABLE SWITCHES: CUSTOMIZE EFFORTLESSLY WITH MX-STYLE SWITCHES.
-
COMFORT & COMPATIBILITY: ENJOY SILENT TYPING ON ANY SYSTEM, HASSLE-FREE.
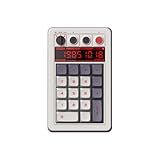
8BitDo Retro 18 Mechanical Numpad, Supports Calculator Mode, Bluetooth/2.4G/Wired Numpad for Windows and Android - N Edition
- 2-IN-1 DESIGN: SEAMLESS SWITCH BETWEEN NUMPAD AND CALCULATOR MODES.
- RETRO LED DISPLAY ENHANCES VISIBILITY AND ADDS NOSTALGIC CHARM.
- HOT-SWAPPABLE SWITCHES FOR CUSTOMIZABLE FEEL AND PERFORMANCE.

EPOMAKER EK21 VIA Gasket Number Pad with 1000mAh Battery, BT 5.0/2.4GHz/Wired Hot-Swap Numpad with Aluminum Alloy knob, Programmable for Win/Mac/Gaming (Black Silver, Zebra Switch)
- CUSTOMIZABLE VIA VIA SOFTWARE FOR TAILORED WORKFLOWS
- TRIPLE CONNECTIVITY & 1000MAH BATTERY FOR ALL-DAY USE
- COMFORT-FIRST DESIGN REDUCES FATIGUE & NOISE DURING TYPING
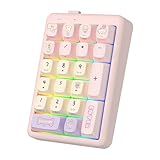
FOPATO NumberPad,21Keys HotSwappable Numpad,Bluetooth5.0/2.4G/Type-C Wireless Numeric Keypad,Rechargeable Number keypad,RGB Gasket Structure Mechanical Keyboard with PBT Keycap for PC Laptop Notebook
- CONNECT UP TO 3 DEVICES SEAMLESSLY VIA BT, USB, OR 2.4GHZ.
- EXPERIENCE SMOOTH TYPING WITH HOT-SWAPPABLE NEPTUNE SWITCHES.
- ENJOY 22 RGB EFFECTS AND 7 DAYS OF BATTERY LIFE ON A RECHARGE!
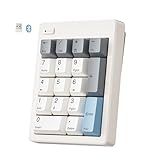
Wireless Mechanical Number Pad, Bluetooth 5.0&2.4G Wireless Dual Mode Hot Swappable Numeric Keypad,17 Keys Gasket Numpad, Ten-Key with PBT Keycaps for Laptop/PC/TKL Keyboards(Beige, Linear Switch)
- VERSATILE DUAL-MODE CONNECTION: SWITCH SEAMLESSLY BETWEEN DEVICES!
- ENHANCED LAYOUT & COMPACT DESIGN: 17 KEYS FOR EFFICIENCY, SAVES SPACE!
- PREMIUM SOUND & CUSTOMIZATION: ENJOY CREAMY SOUNDS WITH HOT-SWAPPABLE SWITCHES!
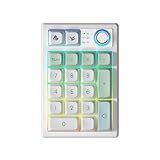
TISHLED Gasket Creamy Mechanical Numpad Programmable Macro Keypad Wireless 2.4G/Bluetooth 5.0/Wired USB-C RGB Backlit Hot Swappable Number Pad Rechargeable Numeric Keyboard Metal Knob for Win/Mac
-
VERSATILE TRI-MODE CONNECTION: CONNECT MULTIPLE DEVICES SEAMLESSLY!
-
CUSTOMIZABLE 18 KEYS: PERSONALIZE SHORTCUTS FOR EFFICIENCY AND SPEED.
-
DURABLE PBT KEYCAPS: ENJOY LONG-LASTING DURABILITY AND SMOOTH TYPING.
The lifespan of mechanical keypads, such as those found in mechanical keyboards, can vary depending on several factors, including the quality of the switches used, frequency of use, and maintenance practices. On average, high-quality mechanical switches, like those produced by manufacturers such as Cherry, are rated for tens of millions of keystrokes per key-often around 50 million to 100 million keystrokes. This durability means that a well-maintained mechanical keyboard can last for many years, even with heavy usage. Regular cleaning and ensuring that no dust or debris accumulates can also help extend a keypad's functional life. However, external factors like liquid spills or mechanical damage can affect longevity. Generally, users find that mechanical keypads remain reliable and offer a consistent typing experience over extended periods.
How to troubleshoot a malfunctioning mechanical keypad?
Troubleshooting a malfunctioning mechanical keypad involves a systematic approach to diagnose and resolve the problem. Here's a step-by-step guide to help you:
- Identify the Symptoms: Determine how the keypad is malfunctioning. Are certain keys unresponsive, behaving incorrectly, or sticking?
- Check Software/Settings: Ensure that no software-related issues are causing the malfunction. Reboot the device connected to the keypad and check if the problem persists. Update the firmware or drivers for the device, if applicable.
- Inspect for Physical Damage: Examine the keypad for visible damage, such as broken or stuck keys, spilled liquids, or cracks in the casing.
- Clean the Keypad: Disconnect the keypad from any power source or device. Use a compressed air canister to blow out dust and debris from between the keys. For more thorough cleaning, gently remove the keycaps using a keycap puller and clean them individually. Use a soft, damp cloth with a mild cleaning solution to wipe the surface and spaces between keys. Ensure it is completely dry before reconnecting.
- Check the Connections: Ensure that the keypad is properly connected to the device. Re-seat the connection or try a different USB port/cable, if applicable. If it's a wireless keypad, check the batteries and connection strength.
- Test with Another Device: Connect the keypad to a different device to see if the problem is specific to the original device or the keypad itself.
- Reset to Factory Settings: Some keypads have a reset option that restores factory settings. Refer to the user manual for instructions.
- Swap Switches: If certain keys are nonresponsive or sticky, consider testing them by swapping the key switches with ones that are working (if applicable and you are comfortable doing so).
- Check for Firmware Updates: For keypads that include firmware, ensure that the device is running the latest version and update if necessary.
- Consult the Manual and Support: Refer to the user manual for specific troubleshooting steps or error codes. Reach out to the manufacturer’s support for further assistance if the problem persists.
- Consider Professional Repair or Replacement: If the keypad is still under warranty, contact the manufacturer for a potential repair or replacement. For expensive or critical keypads, consider professional repair services if you're not able to resolve the issue on your own.
By systematically working through these steps, you can identify the cause of the malfunction and determine the best path forward to restore functionality.
How to enhance the aesthetics of a mechanical keypad?
Enhancing the aesthetics of a mechanical keypad can make it more visually appealing and personalized. Here are some strategies you can consider:
- Keycap Customization: Material: Use keycaps made of different materials such as PBT, ABS, or metal for varying textures and finishes. Color Scheme: Choose a color scheme that suits your taste, such as monochrome, pastel, or a more vibrant mix-and-match palette. Artisan Keycaps: Add artisan keycaps-handcrafted, unique keycaps that serve as focal points.
- Backlighting: RGB LEDs: Incorporate RGB lighting for customizable colors and effects. Custom Lighting Effects: Program dynamic lighting effects or static color options that match your setup or mood.
- Case Modification: Color and Finish: Paint or hydro-dip the case for a custom look or choose a case with a unique finish like wood grain or brushed metal. Material: Upgrade to cases made of different materials such as aluminum, acrylic, or wood for enhanced aesthetics and feel.
- Custom Cables: Coiled Cables: Use coiled cables for a retro appearance. Cable Sleeving: Choose sleeving in colors and patterns that match or complement your setup.
- Unique Profiles and Layouts: Keycap Profiles: Use DSA, SA, or another profile for a distinctive appearance compared to standard OEM or Cherry profiles. Layout Variations: Consider non-standard layouts for a more exotic and personalized look.
- Additional Accessories: Wrist Rests: Choose a wrist rest that coordinates with your aesthetic, using materials like wood, leather, or resin. Keycap Pullers: Use stylish keycap pullers that can also serve as decorative pieces.
- Adding Stickers or Art: Apply decals or custom artwork to the case for added personality.
- Sound Dampening Modifications: While primarily for sound, adding dampening pads can also provide a cleaner, more organized look inside a translucent case.
- Switch Modifications: Experiment with different switch colors or DIY mods like switch painting if visibly accessible.
By blending these elements, you can transform a mechanical keypad into a distinctive piece that reflects your style and enhances your workspace aesthetics.
How to silence mechanical switches without affecting performance?
Silencing mechanical switches without affecting their performance is a popular mod among keyboard enthusiasts who want a quieter typing experience. Here are some effective methods to achieve this:
- O-rings: Adding O-ring dampeners to the keycaps can effectively reduce noise. They cushion the impact when keys are pressed, preventing the keycap from hitting the switch plate and reducing bottom-out noise. Choose the right thickness and hardness for your preference, as thicker O-rings can shorten key travel.
- Switch Dampeners: Some switches come with built-in dampening, like Cherry MX Silent or Gateron Silent switches. These switches are designed specifically to reduce noise.
- Lubrication: Applying lubricant to the switch internals can smoothen the keystroke and reduce audible friction between components. Use a suitable switch lubricant for this purpose.
- Switch Films: Tiny films can be placed between the housing parts of a mechanical switch to reduce wobble and associated noise. This can improve the feel and sound of the switch without affecting performance.
- Sound Dampening Foam: Adding a layer of foam inside the keyboard case can absorb sound and reduce the noise created by key presses. Different foams, like neoprene or silicone, can be used depending on the case design.
- Plate and Case Modifications: Switches mounted on plates made from materials like brass or steel can produce more noise. Opting for a polycarbonate or aluminum plate, combined with a plastic case, might dampen noise. Also, adding a sound dampening pad underneath the PCB (if space permits) can mitigate some sound.
- Silent Switches: Consider using switches specifically designed to be silent. These switches have modifications like added dampeners on the stem to reduce sound without compromising on the tactile or linear feel.
- Keycap Selection: PBT or ABS keycaps can also influence noise levels. Thicker keycaps tend to sound deeper and more muted compared to thin keycaps.
- Typing Technique: Be mindful of your typing technique. Avoid bottoming out the keys by typing more lightly.
By combining these methods, you can significantly reduce the noise from mechanical switches while maintaining their performance and feel. Depending on your keyboard, you might have to experiment with different combinations to achieve the desired sound profile.
What is the difference between Gateron and Cherry MX switches?
Gateron and Cherry MX switches are both popular types of mechanical keyboard switches, but there are several differences between them. Here are the main distinctions:
- Origin and History: Cherry MX Switches: Developed by Cherry, a German company, Cherry MX switches have been around since the 1980s. They are well-regarded for their quality and durability. Gateron Switches: Gateron is a Chinese company that produces switches similar in design to Cherry MX switches. They have gained popularity in more recent years.
- Actuation and Feel: Cherry MX Switches: Known for their consistent build quality and reliability, Cherry MX switches are often perceived as having a slightly more rigid feel compared to Gateron switches. Gateron Switches: Generally regarded as smoother than their Cherry MX counterparts, Gateron switches are favored by some users for this reason. Their linear switches, in particular, are noted for their smooth keystrokes.
- Variety: Both Gateron and Cherry MX offer a variety of switches including linear, tactile, and clicky types, such as Red (linear), Brown (tactile), and Blue (clicky). Gateron also offers additional types like Yellow and Clear switches.
- Durability: Cherry MX Switches: Typically rated for up to 100 million keystrokes per switch, Cherry MX switches are known for their durability and longevity. Gateron Switches: Usually rated for around 50-80 million keystrokes, though some models also claim higher durability. User reports and tests often suggest that Gateron switches hold up well in real-world use.
- Price: Cherry MX Switches: Generally more expensive due to their brand reputation and manufacturing origin. Gateron Switches: Typically less expensive, which makes them a popular choice for budget-friendly mechanical keyboards.
- Sound: The sound can vary depending on the specific switch type and design; however, some users find that Gateron switches tend to be slightly quieter or have a different tonal quality compared to Cherry MX switches, especially in the case of their linear and tactile switches.
Ultimately, the choice between Gateron and Cherry MX switches often comes down to personal preference, intended use, and budget. Both have their strengths, and trying out different types can help determine which suits your needs best.
How to program a mechanical keypad for shortcuts?
Programming a mechanical keypad for shortcuts involves mapping specific keys to execute custom actions or combinations of keyboard shortcuts on your computer. This process is typically done using software and sometimes involves creating custom scripts. Here's a step-by-step guide on how to program your mechanical keypad for shortcuts:
Step 1: Choose Your Software
To program a mechanical keypad, you'll need software that supports key remapping and macro creation. Some popular options include:
- AutoHotkey (Windows): A flexible scripting language for Windows that allows you to create custom shortcuts.
- Karabiner-Elements (macOS): An application for custom keyboard mapping on macOS.
- QMK Firmware: For keyboards that support QMK, you can customize key functions at the firmware level.
- Custom Software from the Manufacturer: Some keyboard manufacturers offer dedicated software for key remapping, such as Razer Synapse or Logitech G HUB.
Step 2: Identify the Keypad's Input
Identify the model and type of your mechanical keypad. Check if it comes with dedicated software for customization. Some keypads offer onboard memory, which keeps the programmed shortcuts even when switched between computers.
Step 3: Install the Software
Download and install the software or tool you've chosen. Follow the installation instructions provided on the software’s website or documentation.
Step 4: Configure the Shortcuts
- Using AutoHotkey (Windows): Install AutoHotkey. Right-click anywhere on your desktop or in a folder and select New > AutoHotkey Script. Open the script file in a text editor and enter the remapping code. For example, to map F1 to open Calculator, you’d write: F1::Run calc.exe Save the script and double-click it to run. The mapped shortcuts will become active.
- Using Karabiner-Elements (macOS): Install Karabiner-Elements. Open the application and navigate to the “Simple Modifications” tab. Select your keyboard from the device list. Add new key mappings to assign shortcuts.
- Using QMK Firmware: QMK customization is more complex and involves compiling new firmware for your keyboard. Follow QMK's documentation for detailed instructions.
- Manufacturer's Software: Open the software (e.g., Razer Synapse). Locate the section for key assignments. Select a key on your keypad and define the function or macro it should perform.
Step 5: Test Your Key Mappings
After setting up your mappings, test each key to ensure it performs the intended action. Make sure the shortcuts do not conflict with critical system shortcuts or other essential functions.
Step 6: Save and Backup
If applicable, save your configuration within the software. Some software allows you to export profile settings; store these backups safely for future use.
Additional Tips
- Consider Layering: Some advanced software and keypads support layers, allowing multiple functions for a single key depending on the active layer.
- Use Simple Scripts Initially: Start with simple key mapping and gradually advance to automate complex workflows.
- Update Regularly: Keep your customization and relevant software updated to ensure compatibility and security.
By following these steps, you can effectively program your mechanical keypad to handle custom shortcuts, streamlining your workflow and improving productivity.