
Best Laptop Docking Stations to Buy in October 2025
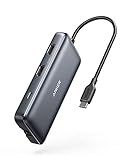
Anker Laptop Docking Station Dual Monitor, 8-in-1 USB C Hub, 4K Dual Monitor with 2 HDMI, 1 Gbps Ethernet Hub, 85W Power Delivery, SD Card Reader for MacBook Pro, XPS and More (Charger not Included)
-
JOIN 50M USERS: EXPERIENCE THE TRUSTED ANKER ADVANTAGE TODAY!
-
ULTIMATE CONNECTIVITY: EXPAND YOUR SETUP WITH VERSATILE 8-IN-1 FUNCTIONALITY.
-
STUNNING DUAL DISPLAYS: ENJOY 4K STREAMING ON UP TO TWO SCREENS EFFORTLESSLY!


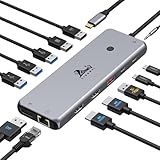
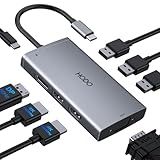
13 in 1 USB C Docking Station - Dual Monitor, Triple Display, 8 USB C/A Ports, Ethernet, Audio - LIONWEI USB C Hub for MacBook,Dell,HP,Lenovo,Surface
-
UPGRADE YOUR DISPLAY: SUPPORTS DUAL 4K DISPLAYS FOR ENHANCED PRODUCTIVITY.
-
LIGHTNING-FAST CONNECTIVITY: 10GBPS DATA TRANSFER & 100W PD CHARGING.
-
VERSATILE AUDIO & ETHERNET: GIGABIT ETHERNET & 3.5MM JACK FOR SEAMLESS USE.
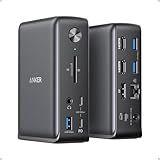
Anker Laptop Docking Station, 13-in-1 USB-C Docking Station, Triple Display with 2 x 4K HDMI and 1 x DP, 85W Charging for Laptop, 10 Gbps USB-C and 5 Gbps USB-A Data, Ethernet, Audio, SD
-
ULTIMATE EXPANSION: 13 PORTS INCLUDING 85W USB-C FOR ALL YOUR DEVICES.
-
DUAL DEVICE CHARGING: CHARGE LAPTOP AND PHONE SIMULTANEOUSLY, HASSLE-FREE.
-
TRIPLE DISPLAY SUPPORT: STREAM ON 3 MONITORS IN STUNNING 1080P@60HZ.
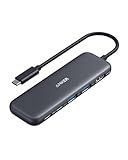
Anker USB C Hub, 5-in-1 USBC to HDMI Splitter with 4K Display, 1 x Powered USB-C 5Gbps & 2×Powered USB-A 3.0 5Gbps Data Ports for MacBook Pro, MacBook Air, Dell and More
- BOOST PRODUCTIVITY: CONNECT AND CHARGE MULTIPLE DEVICES SIMULTANEOUSLY.
- FAST DATA TRANSFER: ENJOY 5 GBPS SPEEDS FOR EFFICIENT FILE SHARING.
- STUNNING 4K DISPLAY: STREAM OR MIRROR CONTENT EFFORTLESSLY ON EXTERNAL DISPLAYS.
USB C Docking Station Dual Monitor Adapter for Dell HP, Laptop Docking Station 3 Monitors Quad Display USB C Hub Dongle to 4K HDMI+DP+VGA,3 USB2.0,100W PD,8 in 1 Thunderbolt Dock for Lenovo,Surface
-
SEAMLESS DUAL/TRIPLE 4K DISPLAYS: ELEVATE MULTITASKING WITH CLARITY.
-
FAST 100W USB C CHARGING: KEEP YOUR DEVICES POWERED EFFORTLESSLY.
-
VERSATILE USB C COMPATIBILITY: SUPPORTS MAJOR LAPTOP BRANDS AND MODELS.
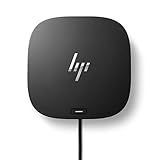
HP USB-C Dock G5-11-in-1 Adapter for Both USB-C and Thunderbolt-Enabled Laptops, PCs, & Notebooks - Single Cable for Charging, Networking, or Data Transfers - Great for Secure & Remote Management
- UNIVERSAL COMPATIBILITY WITH HP AND NON-HP USB-C LAPTOPS.
- DECLUTTER YOUR WORKSPACE BY MINIMIZING CORDS AND WIRES.
- CONNECT MULTIPLE DISPLAYS VIA A SINGLE USB-C CABLE.
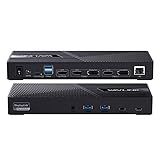
WAVLINK USB C Triple Monitor Docking Station 13-in-1 Displaylink Dock with 100W Charging for Mac, Windows, Chrome, 3 HDMI+2DP, Gigabit Ethernet, USB-C, 4 USB-A 10Gbps, Audio, Driver Required
-
TRIPLE MONITOR SUPPORT: ENJOY 4K RESOLUTION ON YOUR MAIN SCREEN SEAMLESSLY.
-
POWERFUL 130W CHARGING: KEEP YOUR LAPTOP AND DEVICES POWERED ALL DAY.
-
VERSATILE CONNECTIVITY: 6 USB PORTS PLUS ETHERNET FOR FAST DATA TRANSFERS.

Baseus Docking Station, Spacemate(Win) 11 in 1, Triple Display, 4K HDMI and DP, 10Gbps USB A/C Ports, Gigabit Ethernet, 100W PD, Audio, Laptop Docking Station for Windows/Dell/HP/Lenovo/Asus/Acer/Mac
- STUNNING 4K TRIPLE DISPLAY FOR SEAMLESS MULTITASKING
- BLAZING 10GBPS DATA TRANSFER-20GB IN JUST 20 SECONDS!
- COMPACT, STYLISH DESIGN WITH SECURE SCREEN-LOCK FEATURE
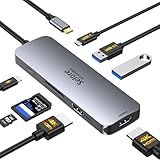
USB C Docking Station Dual HDMI Monitor, USB C to Dual HDMI Adapter with 2HDMI Ports, PD Charging, SD/TF, USB A&C 3.0 Ports, Laptop Docking Station for Dell XPS/HP/Lenovo/Surface/Yoga etc
- TRANSFORM YOUR WORKSPACE WITH DUAL 4K60HZ HDMI SUPPORT.
- SPEEDY 100W CHARGING KEEPS YOUR LAPTOP POWERED ANYTIME, ANYWHERE.
- FAST DATA TRANSFER UP TO 5GBPS WITH MULTIPLE USB PORTS INCLUDED.
Plugable USB 3.0 and USB-C Universal Laptop Docking Station with 2 HDMI Ports for Windows, Mac (Driver Required), and ChromeOS. Gigabit Ethernet, Audio
-
DUAL HDMI OUTPUTS: CONNECT TWO MONITORS FOR ENHANCED PRODUCTIVITY.
-
UNIVERSAL COMPATIBILITY: WORKS WITH WINDOWS, MACOS, AND CHROMEOS SYSTEMS.
-
2-YEAR WARRANTY & SUPPORT: ENJOY PEACE OF MIND WITH DEFECT COVERAGE.
A laptop docking station works by providing a centralized hub for connecting various peripherals and devices to a laptop, enabling users to quickly transition between portable and desktop-like setups. The docking station typically connects to the laptop via USB, Thunderbolt, or proprietary connectors. When the laptop is docked, the station expands the laptop's connectivity options by offering additional ports such as USB ports, HDMI or DisplayPort outputs for external monitors, Ethernet ports for network connectivity, and audio jacks. This allows users to easily connect keyboards, mice, monitors, printers, and other peripherals with minimal hassle. The docking station may also provide power to the laptop, keeping it charged while in use. By consolidating these connections into a single hub, a docking station enhances productivity and convenience, particularly for users who frequently switch between working on the go and at a desk.
How to connect peripherals to a docking station?
Connecting peripherals to a docking station is generally straightforward. Here's a step-by-step guide to help you connect various devices to your docking station:
- Power the Docking Station: Ensure that your docking station is connected to a power source if it requires external power. Some docks may be powered through the computer itself, but larger models with more ports typically need their own power adapter.
- Connect to Your Computer: Use the appropriate cable (usually USB-C, Thunderbolt, or proprietary connectors) to connect your docking station to your computer. Make sure the connection is secure.
- Connect Peripherals: Monitors: Plug your monitor(s) into the docking station's video output ports. These can be HDMI, DisplayPort, DVI, or VGA, depending on the docking station model and your monitor’s inputs. Keyboard and Mouse: Connect your keyboard and mouse to any available USB ports on the docking station. Wireless keyboards and mice can also be connected using a USB receiver. External Drives and Storage Devices: Plug these into USB or Thunderbolt ports as needed. Ensure you safely eject them before disconnecting to avoid data loss. Network (Ethernet): If the docking station has an Ethernet port, connect a network cable for a wired internet connection, which can provide a more stable connection than Wi-Fi. Audio Devices: Connect headphones, speakers, or microphones to the designated audio ports. This could be a 3.5mm audio jack or a USB connection, depending on the dock's features. Other USB Devices: Printers, scanners, cameras, etc., can also be connected via USB. Ensure you have the necessary drivers installed for any devices that require them.
- Install Drivers if Necessary: Some docking stations may require specific drivers to be installed on your computer to function correctly. These are typically available from the docking station manufacturer's website.
- Adjust Settings: Once everything is connected, you might need to adjust display settings (like screen resolution or orientation) or audio settings on your computer to route them through the dock properly.
- Test the Connection: Verify that all connected peripherals are recognized and functioning properly. Check Device Manager (Windows) or System Report (Mac) if you're having issues.
- Troubleshooting: If something isn’t working, ensure cables are securely connected, the docking station is powered and updated with the latest firmware or drivers, and that the ports are functional.
This setup should help you effectively connect and use various peripherals with your docking station.
What is the role of a docking station in a home office setup?
A docking station plays a crucial role in a home office setup by serving as a central hub that enhances the functionality and connectivity of laptops or other portable devices. Here are some of the key roles it plays:
- Connectivity Expansion: A docking station provides additional ports that might be lacking in a laptop. This includes USB ports, HDMI or DisplayPorts for external monitors, Ethernet for wired internet connections, and audio jacks.
- Peripheral Management: It allows users to easily connect peripherals such as a keyboard, mouse, printer, external storage devices, and speakers, reducing the clutter of multiple cables.
- Multi-Monitor Support: Many docking stations support multiple monitors, which can significantly increase productivity by providing more screen real estate for multitasking.
- Power Supply: Some docking stations can charge the laptop and connected devices, reducing the need for multiple power adapters and outlets.
- Convenience and Portability: With a docking station, you can quickly connect and disconnect your laptop from all your peripherals with a single connection, allowing for easy mobility between work areas.
- Cable Management: It helps in organizing and managing cables, keeping the workspace clean and tidy, which can enhance the ergonomic and aesthetic appeal of the home office.
Overall, a docking station streamlines the home office setup, making it more efficient, organized, and capable of supporting a wide range of productivity tools and technologies.
What is a vertical docking station?
A vertical docking station is a device designed to connect a laptop or other portable computer to a range of peripherals and accessories while positioning the laptop in an upright orientation. This setup is particularly useful for saving desk space and ensuring efficient cable management. Here are some key features and benefits of vertical docking stations:
- Space Efficiency: By docking the laptop vertically, it occupies less desk space, freeing up room for other items and contributing to a neater work area.
- Connectivity: Vertical docking stations typically offer multiple ports for connecting monitors, keyboards, mice, external drives, chargers, and other devices. Common connections include USB, HDMI, DisplayPort, Ethernet, and audio jacks.
- Easy Transition: They are designed for quick and simple docking and undocking, allowing users to seamlessly transition from a portable to a desktop setup and vice versa.
- Cooling: The vertical position can improve airflow around a laptop, helping to keep it cool and potentially prolonging its lifespan.
- Cable Management: By routing all cables through a single docking station, users can maintain a tidier workspace with reduced cable clutter.
- Compatibility: While some vertical docking stations are model-specific, designed to fit particular laptop models or brands, there are universal versions available that can accommodate a wider range of devices with adjustable or generic connectors.
Vertical docking stations are especially popular in office environments and among users who frequently switch between mobile and desk-based work. They help streamline workflow and enhance productivity by providing an efficient, organized, and comfortable workstation setup.
What is the best docking station for multiple monitors?
Choosing the best docking station for multiple monitors depends on your specific needs, such as the number of monitors you plan to connect, the preferred connection type (HDMI, DisplayPort, etc.), your laptop or device compatibility, and any additional features you might require. However, some popular and well-regarded docking stations as of the latest information include:
- Dell WD19TB Thunderbolt Dock: Compatible with Thunderbolt 3, this dock supports multiple 4K monitors and provides a range of ports including USB-C, USB-A, HDMI, and Ethernet.
- CalDigit TS3 Plus: Known for its robust build and reliability, the TS3 Plus supports dual 4K monitors at 60Hz via Thunderbolt 3 and offers up to 15 ports.
- Anker PowerExpand Elite Dock: Offers both Thunderbolt 3 and USB-C connectivity and can support dual 4K displays, providing multiple USB-A and USB-C ports, as well as an Ethernet port.
- Plugable USB 3.0 and USB-C Universal Docking Station: This is a versatile dock compatible with both USB 3.0 and USB-C laptops, supporting two monitors up to 4K over HDMI and DisplayPort.
- Lenovo ThinkPad Universal USB-C Dock: Designed for compatibility with a wide range of laptops, this dock can support dual 4K monitors and offers plenty of USB-A and USB-C ports as well as an Ethernet connection.
- Targus USB-C Universal DV4K Docking Station: This dock is known for supporting dual 4K monitors via DisplayPort and HDMI and offers a variety of ports, including USB-A 3.0, USB-C, and Ethernet.
When selecting a docking station, ensure that it's compatible with your device's operating system and supports the resolution and refresh rate you desire for your monitors. Additionally, check that it has enough and the right type of ports for your peripherals and network connection needs.
How to switch between laptop and docking station audio?
Switching between laptop and docking station audio typically involves adjusting settings in your operating system. Here’s a general guide for both Windows and macOS users:
For Windows:
- Connect the Docking Station: Ensure that your laptop is connected to the docking station and any external audio devices (speakers, headphones) are connected to the docking station's audio ports.
- Access Sound Settings: Right-click on the speaker icon in the system tray (bottom-right corner of the screen). Select "Sounds" or "Open Sound settings".
- Select Playback Device: Under the "Playback" tab, you’ll see a list of audio devices. Your laptop speakers and any connected docking station audio devices should be listed here. To switch to the docking station audio, select the appropriate device from the list, then click "Set Default". To switch back to the laptop's audio, select the laptop's built-in speakers or applicable device as the default.
- Apply and Test: Click "OK" or "Apply" to confirm the changes. Test by playing audio to ensure it is outputting from the correct device.
For macOS:
- Connect the Docking Station: Make sure your laptop is connected to the docking station and any external audio devices are connected to the docking station.
- Access Sound Preferences: Click on the Apple menu and choose “System Preferences”. Click on “Sound”.
- Select Output Device: In the “Output” tab, you’ll see a list of available audio devices. To switch to the docking station audio, select the appropriate output device from the list. To switch back to the laptop’s internal speakers, select "Internal Speakers" or the appropriate device.
- Test Audio: Play audio to confirm it outputs from your chosen device.
Tips:
- Driver Updates: Ensure your audio drivers are up to date, especially for the docking station. This can sometimes resolve issues if the device doesn’t appear in the list.
- Application-Specific Settings: Some applications, like conferencing tools or media players, have their own audio output settings. You might need to adjust those separately.
- Automatic Switching: Some setups support automatic switching when you dock/undock. Check your laptop or docking station’s documentation to see if this is a feature you can enable.
By adjusting these settings, you should be able to smoothly switch between your laptop’s audio and the docking station’s audio outputs.
How to set up dual monitors with a docking station?
Setting up dual monitors with a docking station can enhance your productivity by expanding your desktop space. Here’s a general guide that should help you get started:
Gather Required Equipment
- Monitors: Make sure you have two monitors and they are compatible with your setup.
- Docking Station: Ensure your docking station supports dual monitor output and has the necessary ports.
- Cables: Depending on the ports available (HDMI, DisplayPort, VGA, DVI), gather the appropriate cables to connect your monitors to the docking station.
- Adapters: If necessary, have adapters to convert one type of port to another (e.g., HDMI to VGA).
Setup Process
- Position the Monitors: Arrange the monitors on your desk in your desired configuration.
- Connect Monitors to Docking Station: Plug one end of the cable into the monitor and the other end into the corresponding port on the docking station. Repeat this for the second monitor. Ensure you use two different types of ports if the docking station doesn’t allow direct dual connections of the same type.
- Attach Docking Station to Laptop/Computer: Connect the docking station to your laptop using the provided cable (often a USB-C, Thunderbolt, or proprietary docking connector). If required, plug in the power adapter to the docking station to ensure it has power.
- Power On Devices: Turn on both monitors and your laptop or desktop computer. Make sure they are properly connected and powered.
- Configure Display Settings: On Windows: Right-click on the desktop and select “Display settings.” You should see both monitors listed. Click “Identify” to see which is which if needed. Arrange the displays by dragging them in the display settings window to match your physical setup. Select "Extend these displays" from the “Multiple displays” dropdown for dual monitor functionality. On Mac: Open "System Preferences," and select "Displays." Click on the “Arrangement” tab and position the displays as preferred. Uncheck “Mirror Displays” to extend your desktop rather than mirroring it.
- Set Resolution and Orientation: Adjust the resolution and orientation of each monitor in display settings so that they match your preferences, usually aligning with the monitors’ native resolution.
- Check Functionality: Ensure your mouse moves seamlessly between monitors. Open applications to check that their displays can span across both monitors as expected.
Additional Tips
- Driver Updates: Ensure that your graphics drivers and docking station firmware are up to date for optimal performance and compatibility.
- Power Settings: Adjust power settings to ensure that the laptop doesn’t hibernate or sleep when the lid is closed if that is your preference.
- Troubleshooting: If one or both monitors are not detected, try reconnecting the cables, check for faulty cables or ports, or restart your computer.
With these steps, you should be set up for dual monitor use with your docking station. Enjoy the expanded workspace!