
Best Mechanical Keypads to Buy in October 2025
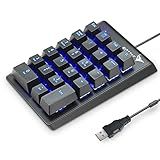
Rottay Number Pad, Mechanical USB Wired Numeric Keypad with Blue LED Backlit 22 Key Numpad for Laptop Desktop Computer PC Black (Blue switches)
-
QUICK TACTILE FEEDBACK: ENJOY FAST, RESPONSIVE KEYSTROKES WITH EVERY PRESS.
-
PLUG & PLAY SETUP: EASILY ENHANCE PRODUCTIVITY WITH NO DRIVERS NEEDED.
-
DURABLE DESIGN: BUILT TO LAST WITH 50M KEYSTROKES AND STABLE DATA TRANSFER.


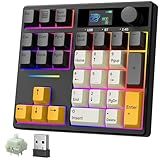
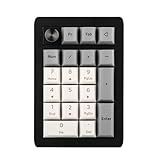
BOYI TD31Pro Mechanical Number Pad,Bluetooth5.0/2.4G/Type-C Wireless Numeric Keypad,RGB HotSwap Numpad with Screen&Knob,PBT Keycaps Rechargeable Gasket Number keypad for PC Laptop Desktop(Black-Grey)
-
TRI-MODE CONNECTIVITY: CONNECT VIA BLUETOOTH, 2.4GHZ, OR TYPE-C EASILY.
-
CUSTOMIZABLE FEATURES: DISPLAY GIFS, BATTERY STATUS, AND SWITCH MODES EFFORTLESSLY.
-
ERGONOMIC DESIGN: PBT KEYCAPS AND ADJUSTABLE ANGLES FOR COMFORTABLE USE.
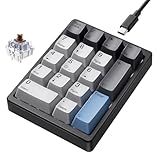
Kisnt Mechanical Number Pad,Hot Swappable Numpad Wired USB 17 Keys Keypad White Backlit Numeric Keypad with PBT Keycaps for Laptop PC Compact Keyboards (Black, Brown Switch)
- COMPACT 17-KEY LAYOUT: SPACE-SAVING DESIGN BOOSTS PRODUCTIVITY EFFORTLESSLY.
- HOT-SWAPPABLE SWITCHES: CUSTOMIZE WITH EASE FOR A PERSONALIZED FEEL ANYTIME.
- MULTI-LAYER COMFORT: ENJOY QUIETER, CUSHIONED TYPING FOR ENHANCED COMFORT.
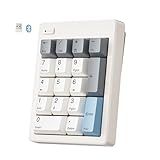
Wireless Mechanical Number Pad, Bluetooth 5.0&2.4G Wireless Dual Mode Hot Swappable Numeric Keypad,17 Keys Gasket Numpad, Ten-Key with PBT Keycaps for Laptop/PC/TKL Keyboards(Beige, Linear Switch)
-
DUAL-MODE CONNECTION: EFFORTLESS SWITCHING BETWEEN BLUETOOTH & 2.4G.
-
COMPACT 17-KEY LAYOUT: ESSENTIAL KEYS INCLUDED; SAVES DESK SPACE!
-
HOT-SWAPPABLE SWITCHES: CUSTOMIZE YOUR TYPING EXPERIENCE WITH EASE.
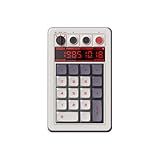
8BitDo Retro 18 Mechanical Numpad, Supports Calculator Mode, Bluetooth/2.4G/Wired Numpad for Windows and Android - N Edition
- 2-IN-1 DESIGN: NUMPAD & CALCULATOR, VERSATILE FOR ALL USERS!
- RETRO LED DISPLAY WITH EASY ACCESS TO WINDOWS CALCULATOR APP!
- HOT-SWAPPABLE KEYS & DURABLE PBT KEYCAPS FOR LASTING PERFORMANCE!
EPOMAKER EK21 VIA Gasket Number Pad with 1000mAh Battery, BT 5.0/2.4GHz/Wired Hot-Swap Numpad with Aluminum Alloy knob, Programmable for Win/Mac/Gaming (Black Silver, Zebra Switch)
- CUSTOMIZABLE VIA SOFTWARE FOR TAILORED WORKFLOW EFFICIENCY.
- TRIPLE CONNECTIVITY & 1000MAH BATTERY FOR ALL-DAY PRODUCTIVITY.
- COMFORT-FIRST DESIGN: CUSHIONED TYPING & REDUCED NOISE EXPERIENCE.
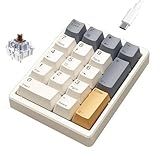
Kisnt Mechanical Number Pad,Hot Swappable Numpad Wired USB 17 Keys Keypad White Backlit Numeric Keypad with PBT Keycaps for Laptop PC Compact Keyboards (Retro Beige, Brown Switch)
-
COMPACT 17-KEY LAYOUT: BOOST PRODUCTIVITY, SAVING SPACE ON YOUR DESK!
-
HOT-SWAPPABLE SWITCHES: PERSONALIZE YOUR TYPING EXPERIENCE WITH EASE!
-
COMFORT & DURABILITY: ENJOY CONSISTENT KEYSTROKES WITH A QUIET DESIGN!
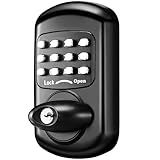
Bravex Keyless Deadbolt Keypad Entry Door Lock Zinc Alloy Sabbath Lock 100% Mechanical Shabbos Lock- No Risk of Low Power, Black
- 💰 MONEY-BACK GUARANTEE FOR WORRY-FREE PURCHASING EXPERIENCE!
- 🔑 FLEXIBLE UNLOCKING: NO REPEATED PASSCODE ENTRY REQUIRED!
- 🔒 DURABLE MECHANICAL DESIGN; NO BATTERY RISKS OR PRYING!
Connecting a mechanical keypad to a device involves a few key steps. Initially, you need to identify the type of interface the keypad uses, such as USB, PS/2, or a GPIO interface for more embedded systems. Once identified, connect the keypad to the appropriate port on your device. If the keypad uses a USB interface, it often requires no additional drivers apart from what the device operating system provides, making it relatively plug-and-play. For PS/2 connections, a simple connection to the corresponding port is necessary, though some modern devices may require a USB adapter due to the lack of PS/2 ports. If connecting through GPIO pins, especially in hobbyist or embedded projects like with Raspberry Pi or Arduino, you'll need to wire the keypad's rows and columns to the respective pins on your device. Firmware or software may also be required to interpret the key presses, which often involves setting up an interrupt-driven or polling method to scan the keypad matrix. Once physically connected, configure your device's software to recognize and interpret the key presses, which may involve installing additional drivers or configuring input settings depending on your operating system or application requirements. If coding is involved, you'll typically write routines to handle the input logic, possibly using libraries if available for your platform. Configuration might also involve mapping specific key functions within the settings of the application or operating system you're using.
How do you pair a Bluetooth mechanical keypad with a tablet?
Pairing a Bluetooth mechanical keypad with a tablet generally involves a few straightforward steps. While the specific instructions may vary slightly depending on the devices involved, here's a general guide to help you:
- Charge the Keypad: Ensure your Bluetooth mechanical keypad is fully charged or has fresh batteries installed to avoid interruptions during pairing.
- Power On the Keypad: Turn on the keypad. There might be a power switch on the side or back of the device.
- Enter Pairing Mode: Most Bluetooth keypads will have a dedicated button or key combination to activate pairing mode. Look for a "Bluetooth" button or consult the keypad's manual for details. Often, you need to press and hold a specific button until an LED indicator starts blinking, signifying the keypad is in pairing mode.
- Access Tablet’s Bluetooth Settings: On your tablet, go to the settings menu. Find the Bluetooth option and ensure it is turned on. The tablet will start searching for nearby Bluetooth devices.
- Select the Keypad: In the list of available devices, look for the name of your mechanical keypad. Select it to initiate the pairing process.
- Enter Pairing Code (if required): Some devices might ask you to enter a pairing code. This code often appears on your tablet screen, and you need to type it on the keypad and press enter.
- Confirmation: Once paired, the keypad should show as connected in the Bluetooth device list on your tablet. You may also see a notification confirming the successful connection.
- Test the Keypad: Open an app, such as a notes application, and test typing to ensure the connection is stable and the keypad works as expected.
- Troubleshooting: If the pairing fails, ensure both devices are close to each other. Turn both devices off and on again and try the pairing process once more. Refer to the manufacturer’s instructions in the manual for device-specific troubleshooting tips.
Once connected, your Bluetooth mechanical keypad should be ready to use with your tablet, providing a tactile typing experience.
How do you diagnose connection issues with a mechanical keypad?
Diagnosing connection issues with a mechanical keypad involves a few systematic steps to identify the root of the problem. Here’s a guide to help you troubleshoot:
- Visual Inspection: Cables and Connectors: Check for any visible damage, such as frayed wires, bent pins, or loose connections. Ensure that all cables are properly connected. Debris and Dust: Inspect the keypad for any dust or debris that might be obstructing the keys or connections.
- Test Alternate Ports/Cables: Different USB Ports: If your keypad connects via USB, try plugging it into a different port on your computer to rule out a faulty port. Replacement Cable: If your keypad uses a detachable cable, try using a different one to see if the cable is the issue.
- Key Functionality: Test Individual Keys: Check if specific keys are not working or if the entire keypad is unresponsive. Use a Keyboard Tester: Online keyboard tester tools help identify which keys are not registering inputs.
- Driver and Software Issues: Update Drivers: Ensure your computer's USB or compatibility drivers are up to date. Software Conflicts: Sometimes software conflicts can cause issues. Temporarily disable or uninstall any software that might interfere with the keypad.
- Test with Another Device: Different Computer: Connect the keypad to another computer to see if it functions there. If it works, the issue might be with your original device. Different Keypad: If possible, test with another similar keypad on your computer to see if the issue persists.
- Power Supply: Check Power Source: If your keypad has any backlighting or advanced features, ensure it's getting enough power. Some high-end keypads require direct connections to a powered USB hub.
- Inspect Internal Components: If you're comfortable doing so, carefully open the keypad to inspect for any internal issues, such as loose connections or damaged circuit boards. This step should only be done if the keypad is out of warranty.
- Consult Manufacturer Support: If the issue remains unresolved after these steps, contact the manufacturer’s support for further assistance or consider professional repair services.
Following these steps should help you identify the cause of connection issues with your mechanical keypad and determine the necessary actions to resolve them.
What is anti-ghosting in mechanical keypads?
Anti-ghosting in mechanical keypads refers to a technology that prevents "ghosting," which is the unintended registration of keystrokes on a keyboard. Ghosting can occur when multiple keys are pressed simultaneously, and the keyboard incorrectly registers additional keystrokes that were not actually pressed. Anti-ghosting ensures that only the keys you press are registered, preventing these erroneous inputs.
In practical terms, anti-ghosting allows for more accurate and reliable simultaneous key presses, which is especially valuable in gaming or typing scenarios where multiple keys might be pressed at once. Many gaming keyboards highlight anti-ghosting as a feature, often allowing for a certain number of simultaneous key presses without error, commonly referred to as "N-key rollover" (where 'N' is the number of keys that can be pressed simultaneously without issues).
How do you build a mechanical keypad from scratch?
Building a mechanical keypad from scratch is a rewarding project that allows you to customize the features and design to your liking. Here's a basic guide to help you get started:
Materials and Tools Needed
- Key Switches: Mechanical switches (e.g., Cherry MX, Gateron) are the core of the keypad.
- Keycaps: These go on top of the switches; choose based on your preference for material and shape.
- PCB (Printed Circuit Board): A custom or pre-made PCB designed for mechanical keypads. This is where switches are mounted.
- Microcontroller: Common choices are Arduino Pro Micro or Teensy for programming the keypad.
- Diodes: Typically 1N4148, used for preventing electricity from flowing in the wrong direction.
- Connector Cable: USB cable for connecting the keypad to a computer.
- Enclosure/Case: To house your keypad. This can be 3D-printed, acrylic, or metal.
- Soldering Equipment: Soldering iron, solder, and desoldering pump.
- Wire Cutters and Strippers: For managing wiring.
- Optional: Microcontroller Programming Tools: Software like QMK or firmware flashing tools.
Steps to Build
- Design Your Layout: Determine how many keys/buttons you want and their arrangement. Sketch out your design on paper or use a program like KLE (Keyboard Layout Editor).
- Select Components: Based on your layout, choose appropriate key switches, keycaps, and components.
- Prepare the PCB: If you're designing your own PCB, use software like KiCAD or Eagle. Otherwise, purchase a PCB that matches your design. If soldering by hand, plan your switch matrix and diode placement.
- Mount the Switches: Insert the switches into the PCB. Ensure they are securely in place since they will be under mechanical stress. If the PCB supports hot-swappable switches, you can skip soldering for the switches.
- Solder Components: Solder each switch to the PCB. Install the diodes between switch contacts according to your matrix design. This is typically done in a row-column scanning matrix to minimize the number of pins used.
- Attach the Microcontroller: Connect the PCB to the microcontroller using the appropriate pins. Follow the wiring plan considering the row-column setup.
- Program the Microcontroller: Use software like QMK Firmware for custom keyboard layouts and macros. Flash the firmware onto the microcontroller using a suitable programmer (e.g., QMK Toolbox).
- Assemble the Case: Place the PCB and components into the case. Secure it using screws or standoffs to ensure it stays in place. Align and screw in the case pieces, ensuring all components fit snugly.
- Testing: Connect your keypad to a computer and test each key to ensure everything works as intended. Use software testing tools like Switch Hitter or Via.
- Customization: Once functioning, consider further customization such as keycap profiles, RGB lighting, or specialized firmware functions.
Additional Tips
- Troubleshooting: If keys don’t register, check solder connections or diodes’ polarity.
- Online Communities: Places like r/MechanicalKeyboards on Reddit or Discord groups can provide ideas and support.
- Iterate Slowly: Start simple to familiarize yourself with the process before attempting more complex designs.
By following these steps, you’ll be on your way to creating a personalized mechanical keypad. Enjoy the process and creativity of building your own custom hardware!
What is the difference between wired and wireless mechanical keypads?
The primary difference between wired and wireless mechanical keypads lies in their method of connectivity and power requirements. Here are some key distinctions:
- Connectivity: Wired Mechanical Keypads: These keypads connect to the device or system they control via a physical cable. This can be USB, PS/2, or another type of connection depending on the keypad's purpose. They require a compatible port or interface on the device for operation. Wireless Mechanical Keypads: These keypads use wireless technology such as Bluetooth, RF (radio frequency), or infrared to connect to the device. They do not require a physical cable, allowing for more flexible placement and less clutter.
- Power Supply: Wired Mechanical Keypads: Typically powered through the connection cable, so there is no need for an additional power source or batteries. Wireless Mechanical Keypads: Require a separate power source, usually in the form of batteries or a rechargeable internal battery. This necessitates periodic recharging or battery replacement.
- Installation and Portability: Wired Mechanical Keypads: Installation may involve dealing with cables, which can be cumbersome in certain setups. Less portable due to the need for attachment and cable management. Wireless Mechanical Keypads: Easier to install as they don’t require cable connections, enhancing portability and ease of use across different devices or locations.
- Signal Reliability: Wired Mechanical Keypads: Generally offer more reliable and consistent signal transmission as it is not subject to wireless interference or distance limitations within cable length. Wireless Mechanical Keypads: Potential for interference from other wireless devices or obstacles. Signal strength can degrade over longer distances, so performance can vary depending on range and environment.
- Latency and Performance: Wired Mechanical Keypads: Typically have lower latency because data is transmitted directly via the cable, often resulting in faster response times which can be crucial for gaming and other performance-sensitive applications. Wireless Mechanical Keypads: Higher latency is possible due to the nature of wireless transmission, but many modern wireless keypads have minimized this issue to achieve performance on par with wired counterparts.
In summary, the choice between wired and wireless mechanical keypads will largely depend on factors such as the intended use, importance of portability, and specific requirements for signal reliability and latency.